The Figure Element-
The following statement displays the image in a web page-
<img src="path/of/image" alt="About image" />
<p>Image of House. </p>
HTML5 has improved the <figure> element tag. User can use <figcaption> element and this way figure can be associated with its captions.
<figure>
<img src="path/of/image" alt="image Description" />
<figcaption>
<p>This is an image of House. </p>
</figcaption>
</figure>
<small> element-
The small element is used for "small print." Suppose user has to create subheadings or caption of the logo, a copyright statement in the footer of any site then the element <small> is best suited for it.
For Making the Content Editable-
This attribute used in the new browsers named as content editable and it allows the user to edit any of the text contained within the element. Following example show the uses of content editable-
<! DOCTYPE html>
<html lang="en">
<head>
<meta charset="utf-8">
<title> Content Editable </title>
</head>
<body>
<h2> Edit Area</h2>
<ul content editable="true">
<li>This attribute used in the new browsers named as </li>
<li>content editable and it allows the user to edit any of the text </li>
<li> contained within the element. </li>
</ul>
</body>
</html>
In the above program we have written <ul content editable=true>
Email as Inputs-
In HTML5 the element "email" is used for the input a valid email address structure. The new browser has this facility however the older browsers are not able to understand the type "email". User simply uses regular textbox for E-Mail input. As-
<! DOCTYPE html>
<html lang="en">
<head>
<meta charset="utf-8">
<title>untitled</title>
</head>
<body>
<form action="" method="get">
<label for="email">E-Mail:</label>
<input id="email" name="email" type="email" />
<button type="submit"> New Submit Form </button>
</form>
</body>
</html>
The Header and Footer element-
In HTML5, simply <header> and <footer> elements are used and are very useful when we have multiple headers and footers in our webpage-
<header>
...
</header>
<footer>
...
</footer>
Autofocus Attribute-
HTML5 have advance autofocus attribute. It automatically focuses a particular text box. As-
<input type="text" name="Country" placeholder="India” autofocus>
Audio Support-
HTML5 provide new <audio> element to play songs, audio files etc. Some most recent browsers offer support for HTML5 audio. As-
<audio autoplay="autoplay" controls="controls">
<source src="song1.ogg" />
<source src="song2.mp3" />
<a>Download above files.</a>
</audio>
Video Support-
Like the <audio> element, the HTML5 also have <video> tag. It can also used in the new browsers. Recently, YouTube has announced a new HTML5 video embed for their videos, for browsers which support it. As-
<video controls preload>
<source src="file1.ogv" type="video/ogg; codecs='vorbis, theora'" />
<source src="File2.mp4" type="video/mp4; codecs='avc1.42E01E,
mp4a.40.2'" />
<p> Your browser isn’t supporting <a href="file3.mp4">Download
video.</a></p>
</video>
Regular Expressions-
HTML has the facility to for writing some regular expression to verify a particular type of textbox. By this new pattern attribute, user can insert a regular expression directly into his mark-up web page.
<form action="" method="post">
<label for="username">Create a User name: </label>
<input type="text" name="username" id="username" placeholder="name" pattern="[A-Za-z]{4,10}" autofocus>
<button type="submit">Move </button>
</form>
Hear the pattern: [A-Za-z]{4, 10} means that it will accepts only upper and lowercase letters. Also the string must have 4 minimum characters, and 10 maximum characters.
To Detect Support for Attributes-
Sometime the browser does not recognize HTML5 attributes so the newer changes and advances becomes absolute. Therefore it is important to figure out how to apply these advance attribute in such browser. There are several ways to figure this out. Mainly we have two ways. The first method is to utilize the excellent modernize library. On the other way, user can create and dissect these elements and to determine what the browsers are capable of or support. Suppose, in the previous example, as user want to determine if the browser can implement the pattern attribute, he could include a small JavaScript code in his page:
alert( 'pattern' in document.createElement('input') ) // boolean;
This is most commonly used method to find out the browser compatibility. Generally the jQuery library uses this type of trick. In the above example, the user is creating a new input element, and also determining whether the pattern attribute is recognized within it or not. If it is recognized then the browser supports this functionality. As-
<script>
if (!'pattern' in document.createElement('input') ){
// start validation client or server side
}
</script>
Mark Element-
The <mark> element is like a highlighter. Any text wrapped within this tag should be appropriate to the recent activity of the user. e.g. when user has to find "Indi’s best cities" on any blog, he could then utilize small JavaScript code to wrap each occurrence of this string within <mark> tags.
<h3> Results of Search </h3>
<p> They came India, just to know about India and ask for, <mark>"Indi’s best cities"</mark>. </p>
Use of <div>
If we have already div tag, then what is the need of header, article, section, and footer tags. These tags are smarter however Div should also be utilized when there is not any better element is available for the job.
For example, suppose user has to find that he needs to wrap a code block within a wrapper element then preferably for the purpose of positioning the content, a <div> makes perfect sense. Sometime a user is wrapping a new blog post, or, perhaps, a list of links in his footer, consider using the <article> and <nav> elements, respectively then the div is more semantic.
The Output Element-
The output element is used to display some part of calculation. Suppose user like to print coordinates of a mouse position, or the addition of a series of numbers, then such information should be inserted into the output element.
In the following example, suppose user has to insert the addition of 2 numbers into an empty output along with JavaScript, after pressing the submit button.
<form action="" method="get">
<p>
10 + 5 = <output name="sum"></output>
</p>
<button type="submit"> Calculate </button>
</form>
<script>
function(){
var f = document.forms[0];
if ( typeof f['sum'] !== 'undefined' ) {
f.addEventListener('submit', function(e) {
f['sum'].value = 15;
e.preventDefault();
}, false);
}else { alert('Your browser is not ready yet.'); }
})();
</script>
Create sliders with the range input-
The HTML5 introduces the new input type range.
<input type="range">
By using this input user can receive min, max, step, and value attributes, among other value. However Opera browser supports this kind of input type.
For example- we are building a real-world polling solution, and we are reviewing how it is happening quite easily.
Step one: Mark-up
In step one, you will create your own mark-up.
<form method="post">
<h1> Total number of candidate turn up </h1>
<input type="range" name="range" min="0" max="10" step="1" value="">
<output name="result"> </output>
</form>
You will notice that, the value of min and max are “0” and “10” and the step is initialized as “1”. When the step is set to 1, then there will then be 10 values to choose. Here you can also take advantage of the new output element that you have learned already.
Step two: CSS
In the step two, you will style it. We'll use colon (:) before and after tag and you will inform the user about your specified min and max values. As-
body{
font-family: 'Myriad-Pro', 'myriad', helvetica, arial, sans-serif;
text-align: center;
}
input{ font-size: 14px; font-weight: bold; }
input[type=range]:before{ content: attr(min); padding-right: 5px; }
input[type=range]:after { content: attr(max); padding-left: 5px;}
output{
display: block;
font-size: 5.5em;
font-weight: bold;
}
In the above example, you are creating content before and after the range input, and making their values equal to the min and max values, respectively.
Step three: The JavaScript
• If the current browser knows what is the input range then it’s ok otherwise alert the user that the demo will not work.
• And dynamically update the output element, as the user moves the slider.
• Listen for when the user mouse off the slider further grab the value, and save it in to the local memory.
• At last when, next time the user refreshes the page, the range and output will automatically be set at the level where they last time selected.
function()
{
var f = document.forms[0],
range = f['range'],
result = f['result'],
cachedRangeValue = localStorage.rangeValue ?
localStorage.rangeValue : 5;
// determine whether the browser is one who
// recognizes the range input.
var o = document.createElement('input');
o.type = 'range';
if ( o.type === 'text' ) alert('Sorry. Your browser is not
supporting. Try the latest Opera.');
// Set initial values of the input & output elements to
// either what's stored locally, or the number 5.
range.value = cachedRangeValue;
result.value = cachedRangeValue;
// When the user makes a selection, update local storage.
range.addEventListener("mouseup", function()
{
alert("The selected value was " + range.value + ". I am using local
storage to remember the value. Refresh and check on a modern
browser.");
localStorage ? (localStorage.rangeValue = range.value) :
alert("Save data to database or something instead.");
}, false);
// Display chosen value when sliding.
range.addEventListener ("change", function(){
result.value = range.value;
}, false);
})();
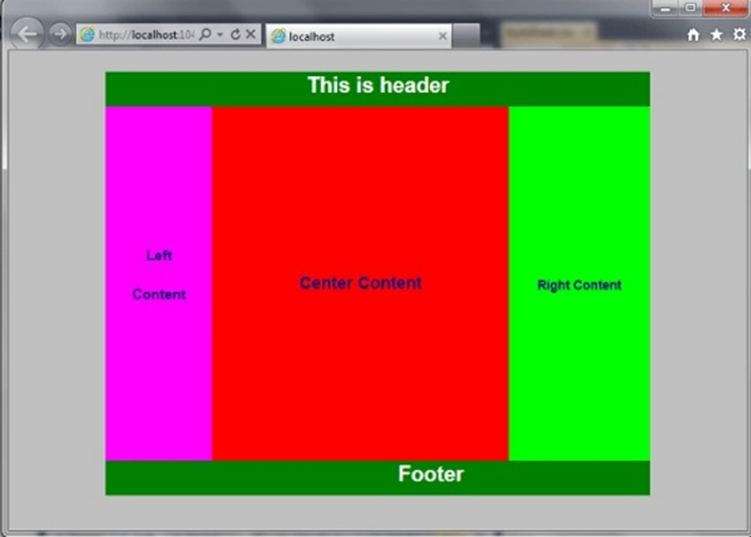
Use of div tag-
In a HTML page to define section or a division the <div> tag is used. In your document you can group large sections as a block and can be formatted using Style Sheet (CSS) in your document. User can wrap a header block in one div and content block in another div. In the given below code, Many div is used for each block. Basically, it’s like a container where an user can create a division in which his documents can reside and also he can alter his own document blueprint by using the class and id names in the div tag. In the position of div tag new HTML5 has begins a number of tags like article, aside, footer, header, section and nav. The example and syntax are given as follows:
Syntax-
<div align="It Specifies the alignment of the paragraph or content inside a div tag. It can also be aligned: center | justify | left | right"
class=" class name of Specification"
dir=" rtl (Right to Left | ltr (Left to Right)"
id="It specifies unique id identifier"
lang=" It Specifies a language code for the content in an element. "
style=" It Specifies style information"
title=" It Specifies advisory text">
</div>
Example- (File Name- Html_div_page.htm)
<!DOCTYPEhtml>
<html>
<head>
<linkhref="HtmlStyleSheet.css"rel="stylesheet"type="text/css"/>
<title> </title
</head>
<body>
<div class="MainBody">
<divclass="header">
<h3>Its header</h3>
</div>
<div class="left">
<h4>Left</h4>
<h5>Content</h5>
</div>
<div class="center">
<h1>CenterContent</h1>
</div>
<div class="right">
<h2>RightContent</h2>
</div>
<div class="footer">
<h3>Footer</h3>
</div>
</div>
</body>
</html>
(File Name- HtmlStyleSheet.css)
body{
margin:0px;
padding:0px;
width:100%;
color:#959595;
font:normal12px/1.8emArial,Helvetica,sans-serif;
background:silver;
}
.MainBody{
width:770px;
margin:0auto;
padding:0px;
}
.header{
background-color:Green;
height:50px;
text-align:center;
font-size:20px;
color:White;
margin:0px;
padding:0px;
width:auto;
}
.headerh3{
font-size:30px;
line-height:40px;
}
.left{
width:150px;
height:500px;
margin:0px;
padding:0px;
background-color:Fuchsia;
float:left;
text-align:center;
}
.lefth4{
font-size:20px;
color:Navy;
margin-top:200px;
}
.lefth5{
font-size:20px;
color:Navy;
}
.center{
width:420px;
background-color:Red;
margin-top:-16.1px;
margin-left:150px;
padding:0px;
height:500px;
}
.centerh1{
color:Navy;
text-align:center;
padding:250000;
vertical-align:bottom;
line-height:500px;
}
.right{
width:200px;
height:500px;
background-color:Lime;
float:right;
margin-top:-500px;
margin-left:0px;
padding:0px;
color:Navy;
text-align:center;
line-height:475px;
}
.footer{
background:yellow;
background-color:Green;
height:50px;
text-align:center;
padding-left:0px;
font-size:20px;
color:White;
margin:-30px0px0px0px;
width:auto;
}
.footerh3{
font-size:30px;
line-height:40px;
}