The HTML was developed to describe the content of the web pages. As-
<h1>This is first heading</h1>
<p>This is first paragraph. </p>
Primarily the number of tags is available in HTML. Lately tags like <font>, color etc. attributes were added in the HTML version. It was a giant progress for web designers. The Font and color tags were typically added to every single page for the Development of bulky websites but it was very long, expensive and boring process. Therefore to solve this problem, the World Wide Web Consortium (W3C) has created Cascading Style Sheets.
This way the CSS is opted for the style formatting and HTML is no longer opted for style formatting of any web page and CSS Saves a Lot of Works in recent time. Normally all the style settings are saved in external .css files. By using that file, we can change the formatting and look of an entire site by changing just one file.
CSS Syntax-
Following is the syntax of Cascading Style Sheets. It consists of a selector and a declaration
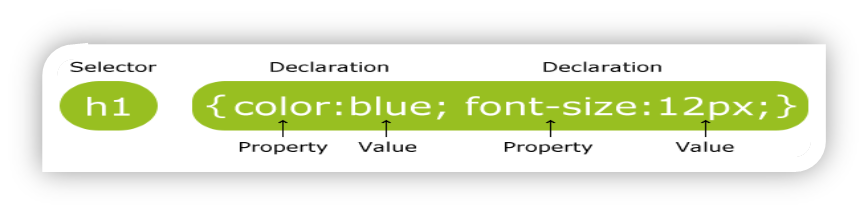
block-
Fig 1: Syntax of Cascading Style Sheets
The selector is a HTML element which we want to style. In the declaration block there are many declarations statement which are separated by semicolons. Every declaration has property name and a value, and which is separated by a full colon. Each CSS declaration ends by semicolon, and the whole declaration blocks are surrounded by “---”.
As the following example where all <p> elements will be left-aligned, with a blue text color:
Example-
p{
color: blue;
text-align: left;
}
CSS Selectors-
Cascading Style Sheets selectors are opted to "find” HTML elements on the source of their element name, id, class, attribute, and many more.
The element Selector
The element selector selects elements on the bases element name. In the following example all <p> elements in a web page look like-
<p> elements will be left-aligned, with a blue text color:
Example-
p{
color: blue;
text-align: left;
}
The id Selector-
For selecting a particular element the, id selector opted the id attribute of the HTML element. This id of the element should be exclusive in entire page. The id selector is opted to select one exclusive element. For selecting an element with a specific id, user should write a hash (#) character, followed by the id of the element.
The style rule as per the following will be applied to the HTML element where id="para1"( id could not start with a number):
Example-
#para1{
text-align: right;
color: green;
}
The class Selector
The class selector also selects elements with a specific class attribute. We write or start with a period (.) when we select elements with a specific class, character, and then followed by the name of the class.
In the following example, all HTML elements are having class="center", colored with red and center-aligned:
Example-
.center{
text-align: center;
color: red;
}
Hear we can also specify that only particular HTML elements should be affected by a class. In the following example <p> is element and class name is "center" which is center-aligned:
Example-
p.center{
text-align: center;
color: red;
}
With HTML elements we can also define more than one class at a time. Class name should not start with number. As in the following example, the element <p> will be styled according to class="center" and to class="large" both:
Example-
<p class="center large">
In this paragraph we have mentioned two classes at a time.
</p>
Grouping Selectors
Consider the following code where different elements with the same style definitions, as:
h1{
text-align: center;
color: red;
}
h2{
text-align: center;
color: red;
}
p{
text-align: center;
color: red;
}
The above code is too long. It is better to group all the selectors, so that the code could be minimized. To group selectors, separate each selector with a comma. In the following example we have grouped the selectors so that the above code could be minimized:
Example-
h1,h2,p{
text-align: center;
color: red;
}
CSS Comments-
We can use the comments to explain the code. It will help we at the time when we edit the source code at a later date. The Comments are always ignored by the browsers. The CSS comments are starts with /* and ends with */. We can span comments in multiple lines:
Example-
p{
color: red; /*single-linecomment*/
text-align: center;
}/*multi-line comment */