History of Facebook-
Facebook was founded on February 4, 2004 by Mark Zuckerberg, Eduardo Severin, Dustin Moskowitz and Chris Hughes in a Harvard dorm room. Facebook has rapidly become one of the largest social networking sites in the world. Within a year, the social networking site earned more than 1 million users - which have grown rapidly to hit more than 2 billion in 2018. Some glimpses of the Facebook history are as follows-
• February, 2004 - Facebook (then called "The facebook") was founded by Zuckerberg, Moskovitz, Saverin and Hughes.
• March, 2004 - Facebook spreads to three college campuses - Yale, Columbia and Stanford.
• September, 2004 - The site launches the now infamous "wall" - which allows users to post things and receive messages on their own page.
• December, 2004 - Facebook hits 1 million users.
• September, 2005 - The site expands to high school networks. It also drops the "the" to become just "Facebook".
• October, 2005 - Facebook adds photos and goes international.
• December, 2005 - Facebook has over 6 million users.
• April, 2006 - Facebook goes mobile.
• September, 2006 - Anyone can now join Facebook.
• February, 2009 - The "like" button is introduced.
• July, 2010 - Over 500 million users are active on Facebook.
• May, 2012 - Facebook releases their IPO - which raised $16 billion and gave the company a $102.4 billion market value.
• October, 2012 - Membership hits the 1 billion mark.
• February, 2014 - Acquisition of WhatsApp is announced.
• April, 2015 - Over 40 million small business pages are on Facebook.
Getting started with Facebook-
If you don't have a Facebook account, you can sign up for one in a few steps:
Step 1- Go to www.facebook.com.
Step 2- If you see the signup form, fill out your Name, Mobile phone number or email address, password, your date of birth, and Your gender.
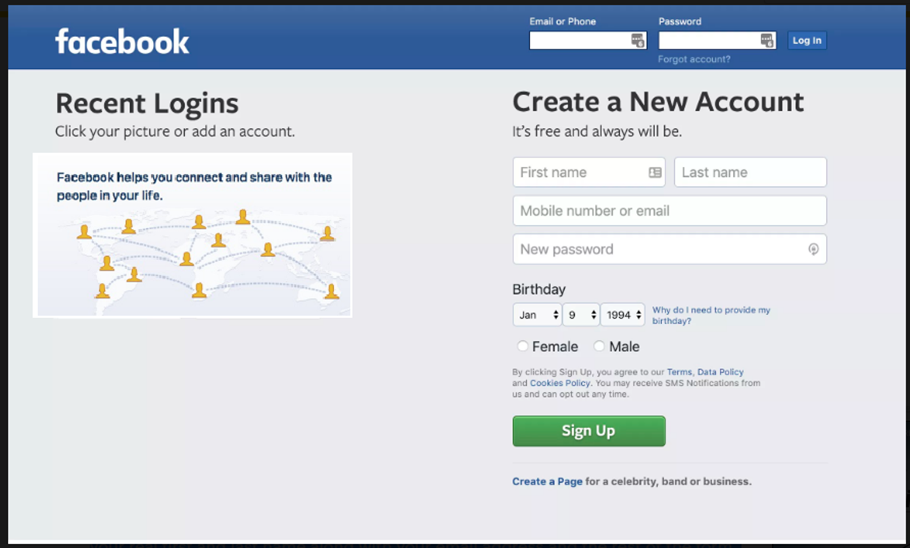
Fig 6.1 Facebook Account Creation (Sign Up) Page
The initial phase in utilizing Facebook is to join and get another Facebook account. Go to www.facebook.com and round out the "Join" structure on the right. On the off chance that you don't see the structure, click Sign Up (this might be in the page's footer), at that point round out the structure. You should give your genuine first and last name alongside your email address and the remainder of the structure. Snap the green sign up button at the base when you're set.
Facebook will send a message to the email address you provided with a link asking you to affirm your email addresses. You'll need to do this if you want full access to Facebook's features.
Your Profile Page-
Your profile page is your profile page ... yours. For example, you can personalize it with a profile picture and cover, and the inclusion (or exclusion) of whatever information you want.
The cover is the large photo that appears on the back of your profile picture.
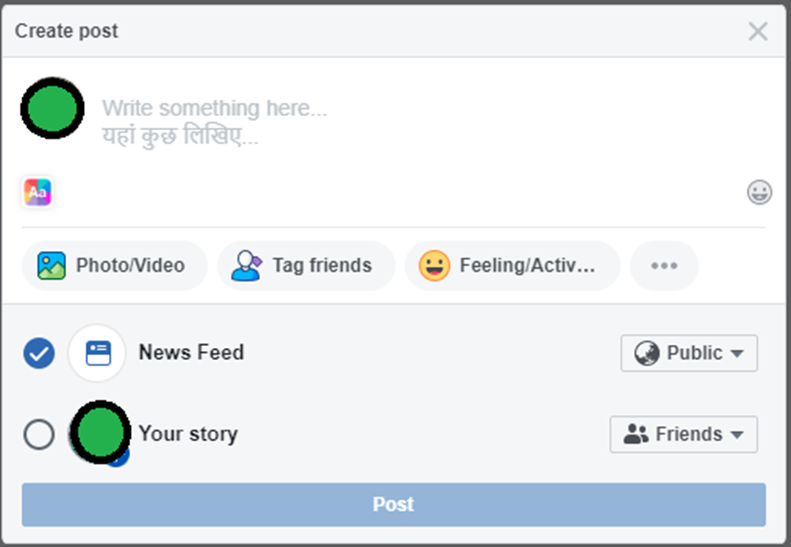
Create posts that allow you to share what you're doing, photos/ videos, or websites that you find interesting. When placing a website, Facebook will automatically give you a thumbnail option to include, as well as tag where you are or who you are with.
Fig 6.2 Facebook Create Post (Status Update) Panel
This will happen immediately unless you change the time to post your status. Again, the biggest thing to remember is that you can include as much or as little information about yourself as you want. Your profile page is your wall. This is what friends see first, and where they can leave public messages. It is both by you and about you.
Your profile page shows a timeline of the event - status updates, photos, wall messages you've written, plus lots of things about you - the music you like, the places you are tagged, your friends, And more.
Finding Friends-
Remember how you can set a lot of privacy settings for your account? Well, the same applies
to everything else. Like, you can set other people's privacy settings and determine if you are able to find them on Facebook, as well as tell you how much of their profile you can see. The amount of their profile that you can see can change even after you are a friend. You can find friends in three ways:
a) Search for friends: By using the email address or their name in the search box at the top of any Facebook page. Type your friend's name in the search bar and click on search icon. To send a friend request to someone, click “add friend” next to their profile picture.

b) Invite friends in person: For those who do not have an FB account, you can send a personal message and invite them to join. FB saves contacts for you so you can see who has joined and is sending reminders.
c) Once a friend request has been sent, they (or you) will be notified that you have a friend request in the dark blue bar at the top, with a red box with two people's icons on it. They (or you) can confirm the request or select "Cancel". If you do not choose now, the request will be hidden. If you confirm the request, they will be added to your friends, and you will immediately start receiving their status updates, and they will start seeing you.
Setting Privacy in Facebook-
When you've made your record (or signed into a current one), proceed to set your security settings with the goal that you can oversee who approaches your data and profile. These settings are found by tapping the down bolt situated in the right-hand side of the top toolbar, under Settings in case you're on a work area or by tapping the three vertical lines in the lower right corner and looking to the base of the subsequent menu in case you're utilizing portable. At that point, search for the Privacy or Privacy Shortcuts connection and click it.
Here, you can set up your privacy settings.
You have three main settings, plus a custom option for even more control.
Public: Everyone can see your content, including those you aren’t friends with.
Friends: Only those who you’re connected to as friends will be able to see your posts.
Only Me: Like it says, this content is hidden from view, and only you can see it.
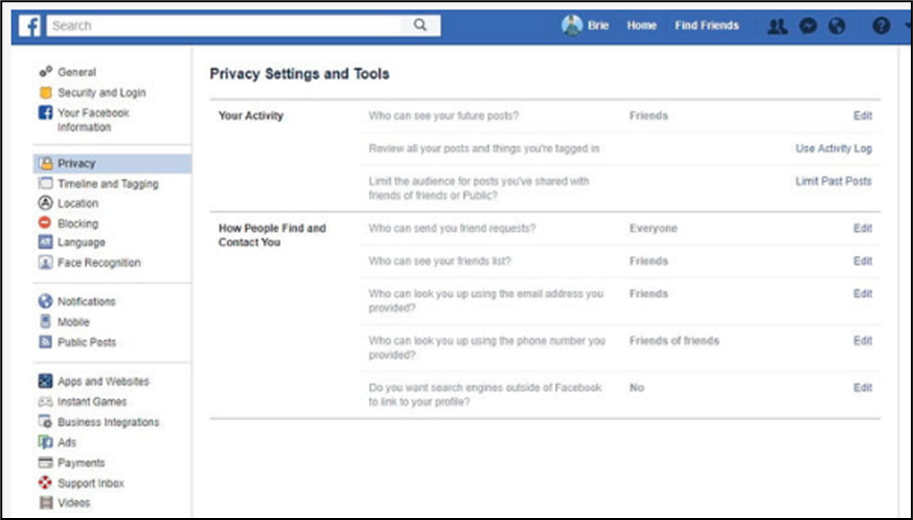
Fig 6.4 Facebook Privacy Setting Page
Blocking-
You can block individuals/messages/application, invites/occasion, greeting from a similar page. Blocking somebody implies that you will be as imperceptible to them as they are to you. You won't have the option to get to his/her profile, or see anything about him/her on the site. The individual who does the blocking is the one in particular who can unblock it.
To block someone:
• Click at the top right of Facebook (at drop down button) and choose Settings.
• Click Blocking in the left side menu.
• In the Block users’ section, enter the name of the person you want to block and click Block.
• Select the specific person you want to block from the list that appears and click Block > Block [name].
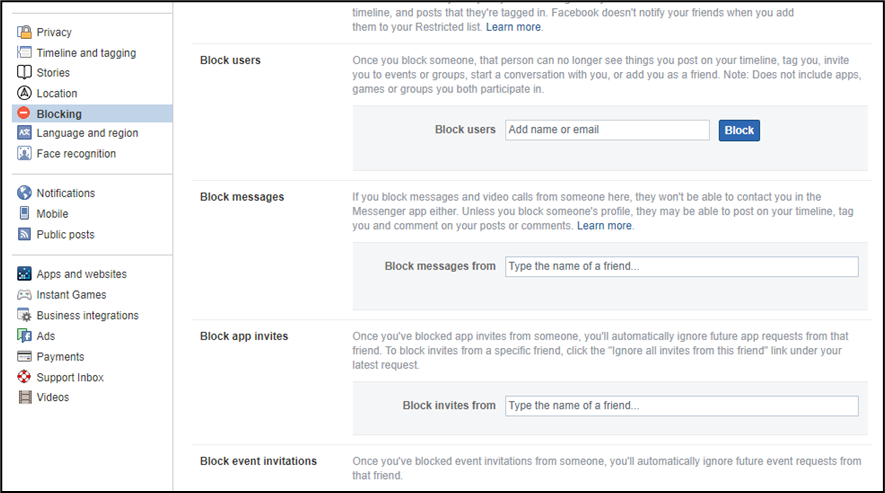 Fig 6.5 Facebook Blocking Setting Page
Like & React to POST-
Clicking “Like” underneath a post on Facebook is an approach to tell individuals that you appreciate it without leaving a remark. Much the same as a remark, any individual who can see the post can see that you enjoyed it.
For example, if you click “like” below a friend's photo:
• People who can see the photo will be able to see that you liked it.
• The person who posted the photo will get a notification that you liked it.

Liking tells your friends that you enjoyed their post or comment, while reacting allows you to specify your response. To “react” to a post or comment, hover over “Like’ and choose a reaction. The most popular reactions appear below the post or comment as icons shows. Keep in mind that you can only leave one reaction per post or comment.